Thursday, May 23, 2013

BABA GANOUSH


BABA GANOUSH
Contributor | TERESA STEBBINS
Grand Rapids, OH

Isn't that just a fun word to say?? One of our favorite toppings for bruschetta or used as a dip for crackers or fresh veggies is baba ganoush...roasted eggplant dip. Since Jeff posted his recipe for Flatbread, I've made it several times. It's such an easy recipe and it's perfect for this recipe! I told him when he came for the photo shoot that it tastes much better than it looks. His comment when I uncovered the dish and he first saw it "Ohhhhhh....." . Yeah, that pretty much says it all until that first taste! It's delicious. Use it the same way you would use hummus. It's thick enough to spread and hold up on a piece of cracker or toasted bread and makes a healthy choice for an appetizer.

I don't really have a recipe for this one. Just slice two eggplants lengthwise in half, drizzle a small amount of olive oil on the cut side, and place oil side down on a parchment lined cookie sheet. Bake for about 1/2 hour at 400 degrees. The cut edge will be toasted and the inside of the eggplant will be completely soft and easy to scoop out. After scraping the insides, leaving the peel behind, place in a food processor along with the juice and zest of a lime, 1 tsp. salt, 1 good Tbsp. of tahini, and blend to combine all the ingredients. It's really great if you can serve it warm right out of the oven, but serving it chilled it's still very flavorful. Add a little more salt if you need to, and spread on flatbread, crackers, or toasted bread for a nice appetizer.

A little side not about the flatbread recipe on the blog! I followed the recipe, but after rolling two pieces out thin, I sprinkled one with zaatar (spice) and place 5-6 small, fresh sage leaves on the bread, then laid the second piece on top and rolled out again, carefully embedding the herbs between the two layers. The sage flavor is really great with the baba ganoush, but don't try to lay it on top...the leaves will burn! Biting into the baba ganoush flatbread is such fun when you see those little leaves peeking out at you...and your taste buds will thank you!


Pin It

Tuesday, March 19, 2013

DIY Panera Bread Asian Sesame Chicken Salad


Contributor| KRISTINA JONES Toledo,OH

So who loves the Asian Sesame Chicken Salad from Panera? 
I do!  It is absolutely delicious and my favorite.
Well, now you can make it yourself with this easy recipe.
If you can't tell, I'm ready for spring and summer!  I'm getting 
 excited about  picking fresh lettuce and cilantro right from the
 garden. This recipe really tastes exactly the same as Panera,  but
you can feed your whole family for a fraction of the price
you'd pay at the restaurant.


Salad:
2 Wonton wrappers
Canola oil, for frying
2 tablespoons sliced almonds
4 cups romaine lettuce, torn into bite-sized pieces, loosely packed
1 tablespoon fresh cilantro, chopped
3 ounces boneless, skinless chicken breast, grilled and sliced thinly on a bias
1/4 cup Panera Bread Asian Sesame Dressing (recipe follows)
1 tablespoon sesame seeds

Asian Sesame Dressing:
1/4 cup rice wine vinegar
1/4 cup toasted sesame oil
2 tablespoons soy sauce
1 teaspoon toasted sesame seeds
1 teaspoon crushed red pepper flakes
3/4 cup canola or vegetable oil


Directions: 
Preheat, the oven to 350 degrees F. To prepare wonton strips, cut wonton wrappers into ¼-inch strips. In a deep skillet, pour canola oil to a depth of 2 to 3 inches. Heat Oil to 365 degrees F. Carefully drop wonton slices into hot oil and fry for about 30 seconds, or until crisp and golden. Remove with slotted spoon and drain on paper towel.

Arrange almonds in a single layer on a sheet pan. Toast in the oven for 5 minutes, toss nuts, then toast for an additional 5 minutes, or until golden. Remove from pan to cool.

To make the asian sesame dressing, combine all ingredients except canola oil in a medium mixing bowl with a wire whisk. Once ingredients are combined, slowly pour in the oil while whisking to form an emulsion.

To make the salad, toss the lettuce, cilantro, wonton strips, chicken and dressing in a large mixing bowl until combined. Place the mixture on a serving plate. Sprinkle with sesame seeds and almonds and serve.


Presented By: Panera Bread


Monday, March 18, 2013

BROWN GARLIC SAUCE with BROWN RICE AND VEGGIE STIR FRY


Contributor| TERESA Grand Rapids,OH

I recently discovered the recipe for this brown garlic sauce. I can't believe the intensity of the sauce and how easy it is to make and use! The recipe makes enough for at least three hearty dishes since the flavors are strong and easily diluted by adding additional broth or water. It's a salty sauce so I don't add any to the dish I'm intending to add it to. Tonight, I even used water instead of broth when I made it to help tame the 'saltiness' of the sauce. It's a very versatile sauce.  You will think you are eating Asian street food!!

Tuesday, February 26, 2013

Sourdough Bread


Contributor| Teresa Stebbins Grand Rapids, OH 

When Richard and I first met he was a bread baker. He was a strict vegetarian and his diet consisted mainly of whole wheat bread with peanut butter and a high protein vegetable soup.
The bread he made was so hearty and delicious  Over the years the bread making was turned over to me, and as kids were added to the scene my days of baking bread were few and far between. It is somewhat time consuming!

Recently he wanted to make bread using a 'starter'. He ordered a sourdough starter from King Arthur Flour that was started in the late 1700's! We think it's cool to have a starter that is a descendant of that starter! He made the first two loaves last night and they are so tangy and delicious. They make amazing toast!

Pin It
After cleaning out the fridge today, I decided to roast a bunch of peppers that needed to be used up, and thawed out some pesto from the freezer, and had toasted sourdough with the pesto and roasted peppers on it for our lunch. Oh my!! So yummy!

Since the bread has no oil or fat added, it's good for Richard who has to watch his cholesterol intake. There is some olive oil in the pesto, but other than that, this was a healthy AND yummy lunch! 

Thanks for stopping by The Empty Spoon! 

Monday, February 18, 2013

ASIAN SLAW WITH GINGER-PEANUT DRESSING


Contributor| Teresa Stebbins 

This is another recipe that only gets better as it sits. Giving the flavor of the dressing time to marry with the vegetable ingredients, really punches up taste.  I've adapted this recipe from one I found that used store bought salad mix. There are preservatives on the bagged salads and I prefer using fresh vegetables, and usually organic is best! It takes a little more time, but I would rather take a little time and effort and have a superior product in the end! We try to be very conscious of what we put into our body. Incidentally, this dressing recipe would be great for other dishes. I think just a little of it on steamed green beans would be great or stir it into some steamed broccoli and rice! Let us know how you used it!

For the Dressing:
1/4 c. honey ( I used agave nectar)
1/4 c. unseasoned rice vinegar
1 Tbsp. soy sauce
1 tsp. Asian sesame oil
1 Tbsp. peanut butter ( I use fresh ground peanuts)
1/2 tsp. salt
1/2 tsp. siracha sauce (optional-if you don't like it spicy)
1 Tbsp. minced fresh ginger
1 large garlic clove, minced
Comine all the ingredients in a bowl and stir until the peanut butter is dissolved. Set aside

For the Slaw:
Shred finely 1/2 half head each of red cabbage and green cabbage. ( I pick small ones)
2 cups shredded carrots
1 red bell pepper, bite sized pieces
1 c. cooked and shelled edamame (I use more-we love them)
2 medium scallions, finely sliced
1/2 c. chopped salted peanuts ( I use what I have on hand...cashews, walnuts, or pecans)
1/2 c. chopped fresh cilantro (leave it out of you don't like it)
Combine all the slaw ingredients in a large bowl. Toss with the dressing. Add a little more salt if you prefer. Chill and serve cold.
Pin It


Photos By Jeff Jones Snap It Photography

Wednesday, January 30, 2013

SWEET POTATO & BLACK BEAN CHILI


Contributor | TERESA
Soup is one of our favorite meals. We look forward to summer ending every year because we have a tripod and iron soup pot that we use to make soup over a bonfire. Now that we are vegetarians, many of our favorite soups are just memories...chicken noodle, white chicken chili, Italian wedding soup, beef chili, minestrone...and the list goes on and on!
      We had to do some searching to come up with new recipes that fit into our new healthy lifestyle, but would still have great taste and appeal. Fortunately  we have found two great chili recipes that are so hearty and delicious that we rarely even think about the soups we have given up!

This sweet potato & black bean chili is so good and only gets better the longer is sits. The added benefits it provides make it our new favorite soup! Macular degenertion runs in my family. I have several relatives who lost their sight due to the disease and I've done some research on my own to find foods that help prevent the disease. Vegetables rich in beta carotene...carrots, butternut squash, and sweet potatoes all have proven benefits, showing a definite preventative effect. Because of this, we eat lots of carrots, and try to have butternut squash or sweet potatoes at least once or twice a week, if not more!

The first thing you need to do to make this recipe is to peel and cube the sweet potato, then drizzle with the olive oil and salt, and roast it, which gives each piece a nice little crust. It amps up the flavor as well, but taking time to do this step keeps the potato from breaking down in the soup.  It's a simple task which can be done while all the other prep work is done, and makes all the difference in the success of the soup! I also use a roasted poblano pepper instead of the jalapeno because my husband doesn't like it too spicy. I set the pepper right on the open flame of my gas stove to blacken and char the skin, then place in a closed baggie for a few minutes and the skin will peel right off.
Pin It


Sweet Potato & Black Bean Chili
2 lbs. sweet potato peeled and cubed
1/2 tsp salt
1 Tbs Olive Oil
Toss the potato in oil, add salt, and roast at 400 for 20-25 minutes. Set aside


In 1 Tbs Olive Oil saute:
1 diced onion
4 minced cloves of garlic
1 red bell pepper
1 diced jalapeno (I use a roasted poblano)
After sauteing for 3-5 minutes, add to a soup pot along with:
2 Tbs chilli powder
1/4 tsp. oregano
1 can diced tomatoes ( I use 1 quart home canned smashed tomatoes)
1-2 cups of water
Salt to taste
1 tsp. cocoa powder
2 cans black beans ( smash one can with a fork or potato masher)
1 chopped chipotle pepper (leave out if you don't like spicy)
Simmer for 20 minutes...enjoy!


One more note! I cook my own black beans from dry beans. One 1 lb bag makes about the amount of 4 cans of black beans and doesn't have the high sodium found in canned beans. The cost for 1 lb is a little over $1, so the savings is enough to want to do it! Cover the beans with plenty of water and boil slowly for about 1 1/2 -2 hours. Leftovers freeze well!

PHOTOGRAPHER JEFF FROM SNAP IT PHOTOGRAPHY Pin It


Saturday, January 26, 2013

Roasted Cauliflower in Olive Oil with Spices


Contributor | JEFF

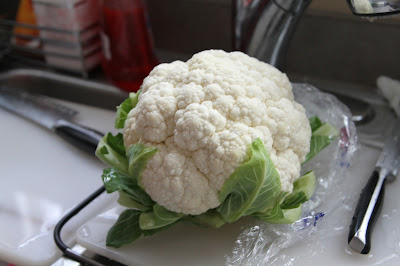
It can be hard to think of eating things that are both healthy and quick. And eating raw veggies can get old sometimes. I like to have variety in my diet so I don't get bored and go to something bad for me. So, I tried roasting cauliflower in the oven with a little bit of olive oil, salt, pepper and an herb and spice blend. After they were done, I drizzled some garlic vinaigrette over them. (I love this local very fresh tasting stuff called Garlic Expressions.) The result: it made my cauliflower taste a lot better than eaten plain or with dip.

Method:
-preheat oven to 350 degrees.
- wash and cut cauliflower and place in a bowl.
- drizzle olive oil onto cauliflower and toss to coat.
- place on baking sheet
- sprinkle lightly with salt, pepper and spices.
- bake for 15 minutes.
- drizzle with vinaigrette and serve immediately.


7 health benefits 

  • It is very low in calories. 100 g of the fresh cauliflower head provides only 26 calories. Nevertheless, it comprises of several health-benefiting antioxidants and vitamins in addition to be very low in fat and contains no cholesterol.
  • Its florets contain about 2 g of dietary fiber per 100 g; providing about 5% of recommended value.
  • Cauliflower contains several anti-cancer phyto-chemicals like sulforaphane and plant sterols such asindole-3-carbinol, which appears to function as an anti-estrogen agent. Together these compounds have proven benefits against prostate, breast, cervical, colon, ovarian cancers by virtue of their cancer-cell growth inhibition, cytotoxic effects on cancer cells.
  • Furthermore, Di-indolyl-methane (DIM), a lipid soluble compound present abundantly in Brassica group of vegetables has found effective as immune modulator, anti-bacterial and anti-viral compound by synthesis and potentiating Interferon-Gamma receptors. DIM has currently been found application in the treatment of recurring respiratory papillomatosis caused by the Human Papilloma Virus (HPV) and is in Phase III clinical trials for cervical dysplasia.
  • Fresh cauliflower is an excellent source of vitamin C; 100 g provides about 48.2 mg or 80% of daily recommended value. Vitamin-C is a proven antioxidant helps fight against harmful free radicals, boosts immunity and prevents from infections and cancers.
  • It contains good amounts of many vital B-complex groups of vitamins such as folates, pantothenic acid (vitamin B5), pyridoxine (vitamin B6) and thiamin (vitamin B1), niacin (B3) as well as vitamin K. These vitamins is essential in the sense that body requires them from external sources to replenish and required for fat, protein and carbohydrate metabolism.
  • Further, It is an also good source of minerals such as manganese, copper, iron, calcium and potassium. Manganese is used in the body as a co-factor for the antioxidant enzyme, superoxide dismutase.Potassium is an important intracellular electrolyte helps counter the hypertension effects of sodium.
    Source


Pin It


Thursday, January 24, 2013

Feta & Greek Yogurt Dip with Lemon,Thyme & Garlic


 Contributor | JEFF & KRISTINA
Sometimes when we're in the kitchen ideas will pop into our heads to give a recipe that extra punch. You better believe that's what we did with this rich and creamy flavorful dip! Starting with blended feta cheese, this dip is infused with olive oil, thyme, garlic, lemon and sea salt. We added a little Greek yogurt and dried basil to ours too. 

If you like feta cheese, this dip will become your go to dip trust me! (Sweet Paul says so and it is true!)  It takes less than 5 minutes to make and is so versatile. You could use it as a veggie dip, spooned onto baked or grilled chicken, on top of toasted  bread slices or with pita chips or even with oven fries...the list could go on and on. When you try this dip your taste buds will be thanking you. Now for the recipe:
Recipe 

8oz feta cheese, crumbled
1 tablespoon grated lemon zest
2 tablespoons lemon juice
1 clove garlic, chopped
6 tablespoons olive oil+ extra for serving
fresh thyme

Recipe courtesy of Sweet Paul

our modified version reduced the amount of feta cheese to 6 oz. and we added 1/4 cup of Greek yogurt, and a dash of sea salt and freshly ground pepper. 
Facts |
Greek yogurt
-contains bacterial cultures that boost the immune system.
-contains less sugar and more protein than other yogurts. 
-has vitamin B12 a disease preventative vitamin.
-can lead to weight loss, especially around the waist. 

Garlic
-can help lower blood pressure
-aids in detoxifying
-antibacterial, antiparasitic, and antifungal


Olive oil 
-allows the absorption of fat-soluble nutrients such as vitamin A and E 
-omega 6 fatty acids
-contains a newly discovered compound called oleocanthal that has the same anti-inflammatory action as ibuprofen.
If you make this dip or a variation, share with us how you liked it and what you ate it with. 


Don't forget to follow The Empty Spoon via Google Friend Connect, Facebook and Pinterest.
Pin It

Wednesday, January 23, 2013

Mint Chocolate Chip Cookies

 Contributor | KRISTINA   
Now it's time for a sweet treat recipe, a little indulgence after eating so healthy. I would personally like to hug whoever came up with the combination of mint and chocolate. It is my favorite! It's funny-seems like people are never neutral about this combo-they either love it or hate it, the haters claiming it tastes like toothpaste. Not me, I am in the love category forever! These cookies are great eaten alone or work well for ice cream sandwiches, pressed down a little flatter before baking: Here's the recipe:


Ingredients: 
  • 2 cups all-purpose flour (I used half whole wheat, half unbleached white)
  • 2/3 cup baking cocoa
  • 1 teaspoon baking soda
  • 1/2 teaspoon salt
  • 1 cup (2 sticks) butter, softened
  • 2/3 cup granulated sugar
  • 2/3 cup packed brown sugar
  • 1 teaspoon vanilla extract
  • 2 large eggs
  • 1 2/3 cups (10-oz. pkg.)  Chocolate chips 
  • 8-10 drops peppermint extract
  • Method: 
  • PREHEAT oven to 325° F.

    COMBINE flour, cocoa, baking soda and salt in small bowl. Beat butter, granulated sugar, brown sugar, mint extract and vanilla extract in large mixer bowl until creamy. Add eggs, one at a time, beating well after each addition. Gradually beat in flour mixture. Stir in morsels. Drop by well-rounded tablespoon onto ungreased baking sheets (I lined  mine with parchment paper). For ice cream sandwich cookies, press or roll flat circles onto cookie sheets. 

    BAKE for 11 to 13 minutes or until cookies are puffed and centers are set. Cool on baking sheets for 2 minutes; remove to wire racks to cool completely.

    FOR MINI MINT CHOCOLATE DELIGHT COOKIES:Prepare dough as above. Drop by well-rounded measuring teaspoon onto ungreased baking sheets. Bake for 9 to 10 minutes or until cookies are puffed and centers are set. Makes about 7 dozen mini cookies.  Recipe modified from The Very Best Baking


 Pin It
You better believe I doubled this recipe and froze half in a freezer bag for on-demand cravings. They were amazing as sandwiches with mint chocolate chip ice cream in the center. Sorry I didn't post pictures of them, they were gone too fast. I finished off my cookies with a light dusting of powdered sugar, because it made them so pretty!